Text wrapping around images in PowerPoint is a powerful technique that can enhance the visual appeal, emphasize key details, and aid storytelling in your presentations. However, many people are unsure of how to do it. In this article, we will show you how to wrap text around an image in PowerPoint simply and effectively. With this knowledge, you can create more engaging and informative presentations that will improve your audience's comprehension and retention of the content.
Part1: How to Wrap Text Around an Image in PowerPoint
1. Insert Spaces Around Object Manually
PowerPoint doesn't have a built-in text wrap feature like some word processors or graphic design software, but you can achieve text wrapping around an image manually using text boxes. Here's a step-by-step guide:
Step 1: Open your PowerPoint presentation.
Step 2: Insert your image:
Go to the "Insert" tab in the PowerPoint ribbon.
Click "Pictures" to add your image from your computer or other sources.
Step 3: Insert a text box:
Go to the "Insert" tab again. Click "Text Box."
Step 4: Draw a text box around the image:
Click and drag your mouse to draw a text box around the image. This will be where your text wraps.
Step 5: Add your text:
Type or paste your text into the text box.
Step 6: Adjust the text box:
Simply select the image, right click on it, then navigate to Send to Back.
That's it! You've manually wrapped text around an image in PowerPoint. Remember that this method may require some adjustments and patience to achieve the desired visual effect, but it offers flexibility in controlling how the text wraps around the image.
2. Use Text Boxes Around Image
Step 1: Insert your picture
Go to the "Insert" tab in the PowerPoint ribbon.
Click "Pictures" to add your image from your computer or other sources.
Step 2: Insert a text box:
Go to the "Insert" tab again. Click "Text Box."
Step 3: Place a Text Box on each side and at the top and bottom to give the effect that the text wraps around the image.
Step 4: Save:
Once you're satisfied with the text wrap, save your presentation.
3. Copy the text and image from Word
You can also copy text and images from Word and wrap text around the image in PowerPoint. Here's how:
Step 1: Open your Word document.
Step 2: Insert the picture to Word
Step 3: When you right-click on the image, a display box will show up with Wrap Text (as shown in the image above).
Step 4: Chose Square and ended up with this:
Step 5: Open your PowerPoint presentation.
Go to the Insert tab and then find Text. From there, you’ll see an option to select Object.
Step 6: Select Microsoft Word from the drop-down list
Step 7: Insert the image and your text:
Step 8: Save:
Once you're satisfied with the text wrap, save your presentation.
Tip: If you need to change your image or the text, you will have to open Word and make your changes there.
Part2: Best Alternative — WPS Office
Microsoft Office has been the market leader in office productivity software for decades, offering robust applications such as Word, Excel, and PowerPoint. However, with the rise of cloud-based solutions and the increasing demand for cost-effective options, free alternatives like WPS Office have gained popularity.
Why should you choose WPS Office as an alternative to Microsoft Office?
Here are the answer:
● Free to use Word, Excel, and PPT. Powerful PDF toolkit
● Rich template store, which contains variousfree and paid templates for Word, PPT, and Excel
● Rich functions
● The light weight of the product is only 200M, and it occupies a small amount of computer memory. It is suitable for Win7, 10, and 11
● The MAC version of WPS Office is very powerful. Microsoft office ignores the experience of mac users, which can be made up by wps office
● Supportonline documents (WPS AirPage), multi-person collaborative editing
● WPS office also supports Linux systems, Android, and ios systems. To use WPS office products on different systems, you only need to log in to the same account, and all files can be synchronized
How to Wrap Text Around an Image in WPS Office Presentation
WPS Office provides an alternative to Microsoft PowerPoint for wrapping text around images. Here's a step-by-step guide:
Step 1: Open WPS Office Presentation. Create a new presentation or open an existing one.
Step 2: Insert your image:
Click on the slide where you want to insert the image.
Go to the "Insert" tab in the WPS Office Presentation.
Step 3: Insert the text box:
Click on the "Insert" tab again. Click "Text Box."
Step 4: Add your text:
Type or paste your text into the text box.
Step 5: Draw a text box around the image:
Click and drag your mouse to draw a text box around the image. This will be where your text wraps.

WPS Office offers enhanced visual design, improved readability, increased content density, and a professional look, making it a viable alternative to wrap text around images in PowerPoint.
You feel WPS Office is the best choice for you and want to download? Don’t worry, below is step by step how to download WPS Office:
Step 1: Visit the WPS Office website:wps.com.
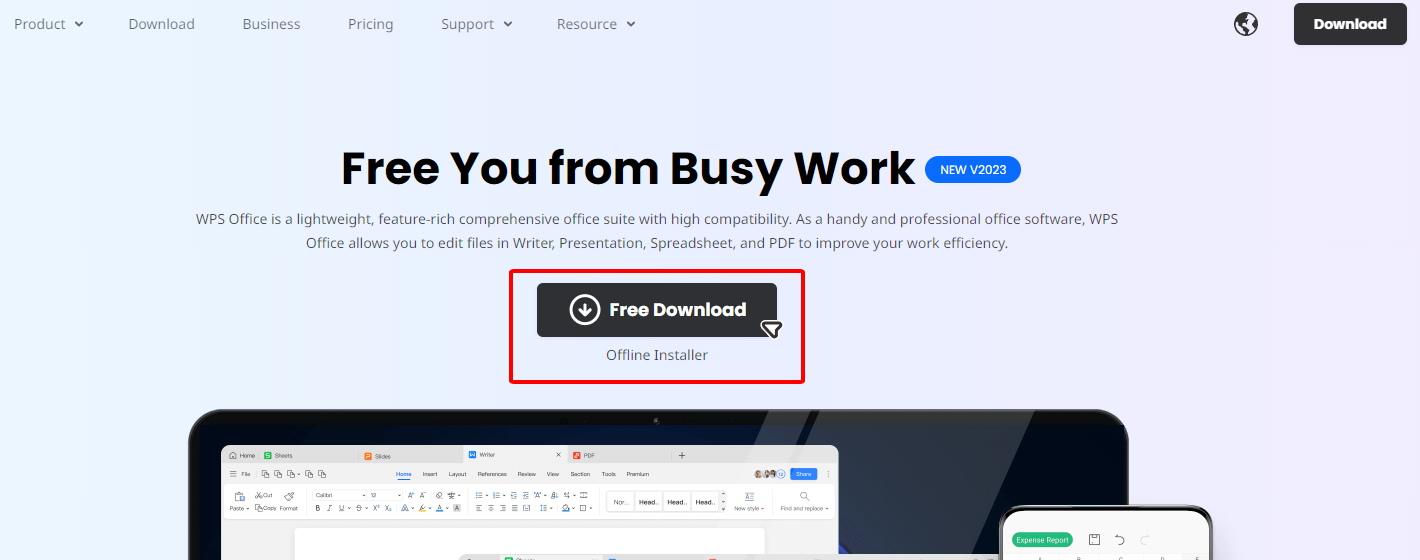
Step 2: Click “ Free Download” button

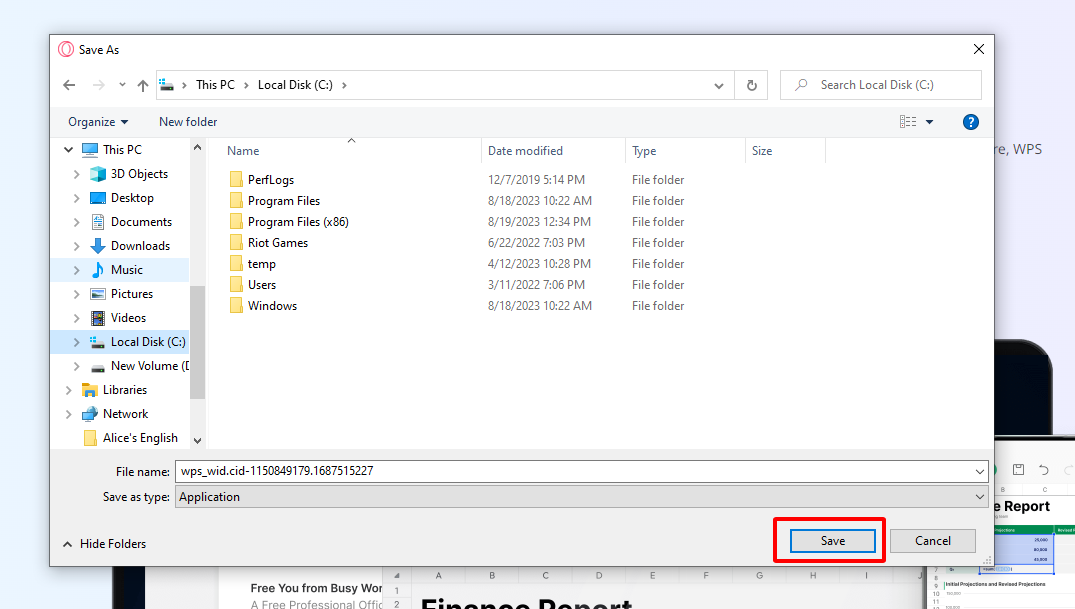
Step 3: Select the place you want to save WPS Office -> Save

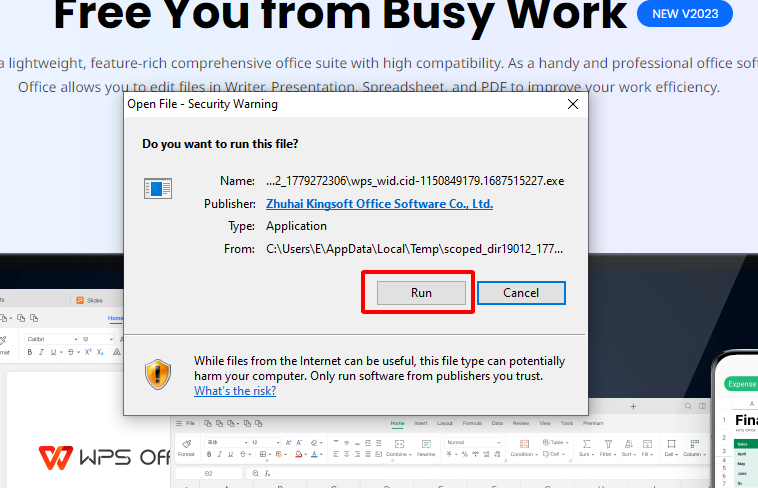
Step 4: Double click on the WPS Office file in your Download file, click “Run” and follow the on-screen instructions to install

Step 5: After complete, you can enjoy all the power of WPS Office
Frequently Asked Questions (FAQs)
Q:How to make a picture transparent in PowerPoint?
Here’s how we do:
Insert Image: Add your image to the slide.
Select Image: Click on the image you want to make transparent.
Set Transparency: Go to the "Format" tab, click "Color," then choose "Set Transparent Color."
Adjust: Click the color in the image you want to make transparent.
Fine-tune (optional): Use the "Picture Transparency" slider in the "Format" tab for precise adjustments.
Save: Save your presentation.
Q:How to curve text around a circle or other shape?
To curve text around a circle or other shape in PowerPoint, use the Transform text effect. Select the text and go to Shape Format > Text Effects > Transform > Follow Path. Select the shape that you want to curve the text around and click OK.
Q:How to make text fit into a shape in powerpoint?
There are two ways to make text fit into a shape in PowerPoint:
● Use the Text Fit options. Select the text box and go to Shape Format > Text Fit > Fit to Text. Adjust the font size and line spacing as needed.
● Use the Merge Shapes feature. Select the text box and the shape that you want to merge, and go to Shape Format > Merge Shapes > Intersect.
Which method should you use?
The Text Fit method is easier to use, but it may not always give you the desired results. The Merge Shapes method gives you more control, but it is a bit more complicated to use.
Q: How to Change Transparency of a Shape or Text Box?
Select Shape/Text Box: Click the shape or text box.
Format: Go to the "Format" tab.
Adjust Transparency: Click "Shape Fill," choose "More Gradients" or "Picture," adjust the "Transparency" slider.
Save: Save your presentation.
Q: Can I make only a specific part of an image transparent in PowerPoint?
A: No, PowerPoint doesn't offer a direct tool to make specific parts of an image transparent. However, you can achieve this effect by using image editing software like Photoshop to create a transparent background around the specific part of the image before inserting it into PowerPoint.
Summary
The article "Free Ways to Wrap Text Around an Image in PowerPoint" explores methods for text wrapping, highlighting WPS Office as a notable solution. It delves into manual techniques using text boxes, emphasizing WPS Office's enhanced visual design and improved readability. With step-by-step guidance, it explains how to insert spaces around objects, use text boxes around images, and copy content from Word.
The tutorial focuses on achieving a professional look, increasing content density, and improving overall presentation aesthetics, making WPS Office a versatile alternative for effective text wrapping in PowerPoint.


