Creating engaging and organized PowerPoint presentations is crucial for effective communication. One essential element is slide numbers, which provide a clear path through your content. In this guide, we'll walk you through the process, ensuring a seamless experience for both you and your audience.
Part 1: What Are Slide Numbers

Slide numbers are a way to reference and navigate through a presentation. They typically appear in the footer or header of each slide, but can also be placed in different locations on the slide. Slide numbers can be used for a variety of purposes, including:
Helping the presenter stay on track and organized
Allowing the audience to follow along and take notes
Making it easy to reference specific slides during the presentation or later on
Giving the presentation a more professional look and feel
Number Format:
Slide numbers can be formatted in a variety of ways, including:
Arabic numerals: 1, 2, 3
Roman numerals: I, II, III
Alphabetic characters: A, B, C
Custom formats: For example, you could use slide numbers to represent different sections of your presentation, such as "Section 1.1," "Section 1.2," and so on.
Slide numbers are an important part of any presentation. They make it easier for the presenter and audience to follow along and reference specific slides.
Part 2: A step-by-step guide on adding Slide Numbers in PowerPoint
Creating a seamless and informative presentation involves incorporating slide numbers for easy navigation. Follow these steps to effortlessly add slide numbers to your PowerPoint presentation:
To add slide numbers in PowerPoint:
Step 1: Open your PowerPoint presentation.

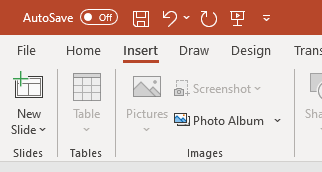
Step 2: Click the Insert tab.
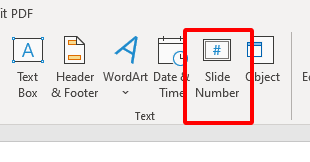
Step 3: In the Text group, click Slide Number.
Step 4: In the Header and Footer dialog box, click the Slide tab.
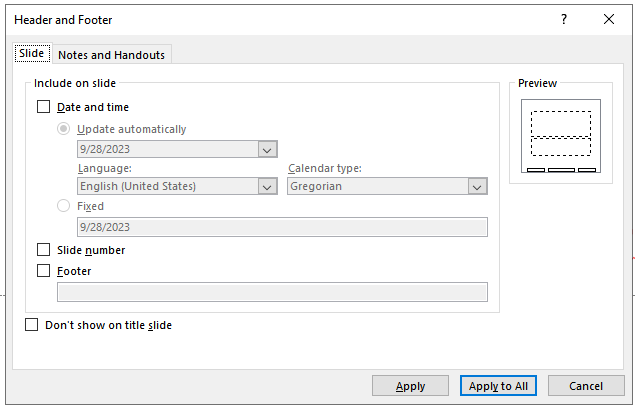
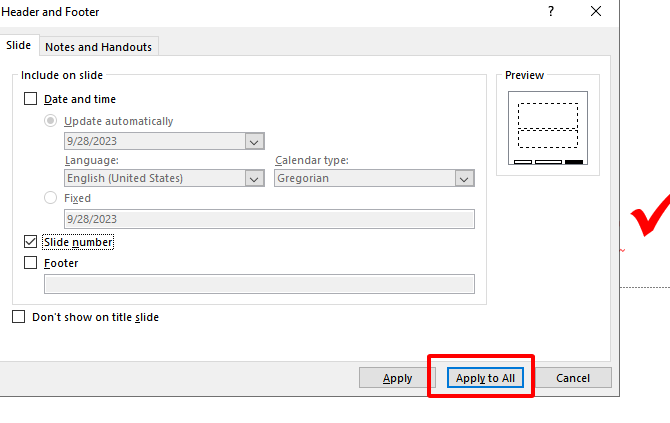
Step 5: Select the Slide number check box.
Step 6: If you don't want a number to appear on the title slide, also select the Don't show on title slide box.
Step 7: Click Apply to All.
Your slide numbers will now appear on each slide in the bottom-right corner.
To customize the slide numbers:
Step 1: Click the Slide Number button in the Header and Footer dialog box.

Step 2: In the Slide Number dialog box, you can change the font, size, color, and alignment of the slide numbers.

Step 3: You can also choose to display the slide number with or without the total number of slides in the presentation.
Step 4: Click OK when you're finished.
Tips:
To update slide numbers after adding or removing slides, click the Slide Number button in the Header and Footer dialog box and select Update Slide Number.
To add slide numbers to specific slides, select the slide(s) you want to add slide numbers to and then click the Slide Number button in the Header and Footer dialog box.
If you're using a template, note that the slide numbers may already be formatted for you. However, you can still customize them as needed.
Part 3: How to Removing Slide Numbers in PowerPoint
When it comes to removing slide numbers in PowerPoint, you have two options: you can either temporarily hide them or permanently remove them. Follow these steps with accompanying images for both methods:
Temporarily Hiding Slide Numbers
Step 1: Open your PowerPoint presentation and go to the slide containing the numbers you want to hide.
Step 2: Click on the slide to select it.
Step 3: Navigate to the "Insert" tab in the ribbon at the top.

Step 4: Select "Header & Footer" from the drop-down menu.
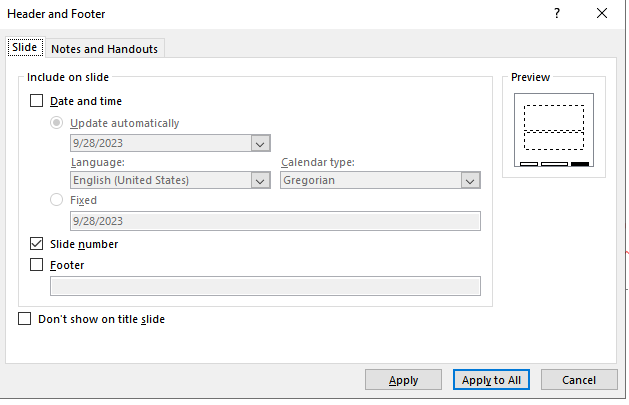
Step 5: In the Header and Footer dialog box, uncheck the box next to "Slide number."
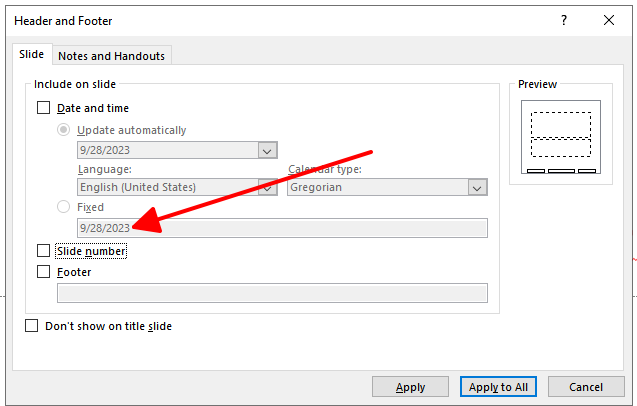
Step 6: Click "Apply" to hide the slide numbers on the selected slide.
This method allows you to quickly hide slide numbers for a clean and focused presentation. However, remember that if you need to bring them back, you'll have to revisit the Header and Footer settings.
Permanently Removing Slide Numbers
Step 1: Open your PowerPoint presentation.
Step 2: Navigate to the slide sorter view by clicking on the icon at the bottom-right corner of the PowerPoint window.
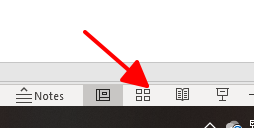
Step 3: Select the slides from which you want to permanently remove slide numbers.
Step 4: Right-click on the selected slides and choose "Delete Slide."
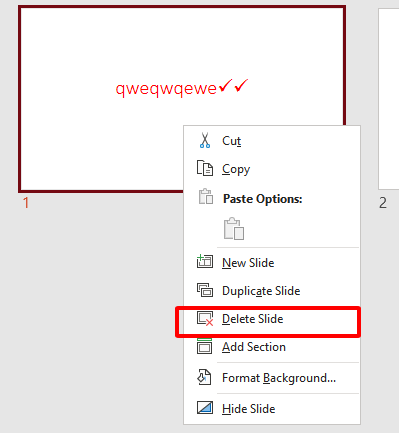
Step 5: Confirm the deletion if prompted.
This option provides a clean slate for specific slides, ensuring an uncluttered look. Just be cautious, as this action is irreversible. Always consider if it aligns with your overall presentation strategy.
Part 4: Solving Common Problems with Slide Numbering in PowerPoint
Slide numbers can sometimes be a bit finicky. Here are solutions to some of the most common issues you might encounter:
Slide Numbers Not Appearing: If your slide numbers aren't showing up, it could be due to a few reasons. First, make sure they're enabled in the Header and Footer settings. Check if they're set to appear on the title slide as well. Additionally, ensure that there's no overlapping text or graphics obscuring the numbers.
Slide Numbers Not Updating: Sometimes, after making significant changes, slide numbers may not update automatically. To fix this, click on the "Insert" tab, go to "Header & Footer," and then tick the box that says "Slide Number." After that, click "Apply to All" to update all slides.
Slide Numbers Appearing on Specific Slides Only: This issue might arise if certain slides have unique master layouts. To rectify this, select the affected slides, go to the "View" tab, and choose "Slide Master." From there, ensure that the slide numbers are set to appear uniformly across all slides.
Part 5. Versatile Powerpoint Tool - WPS Office

WPS Office is a modernized powerful office tool suite that offers a variety of features, including a word processor, spreadsheet, presentation software, and PDF editor. It is available for free download and use, and it is compatible with a wide range of devices, including Windows, Mac, Android, and iOS.
WPS Office is a great alternative to Microsoft Office, and it offers a number of advantages, including:
Free to use: WPS Office is free to download and use for personal and commercial purposes.
Powerful PDF toolkit: WPS Office includes a built-in PDF editor that allows you to create, edit, and convert PDF files.
Rich template store: WPS Office offers a rich template store with a wide range of templates for presentations, documents, and spreadsheets.
Rich functions: WPS Office offers a wide range of features and functions, including support for macros, formulas, and charts.
Light weight: WPS Office is a lightweight application that does not require a lot of system resources.
Support online documents: WPS Office supports online documents, which allows you to access and edit your documents from anywhere with an internet connection.
Safe and stable: WPS Office is a safe and stable application that is regularly updated with new features and security patches.
I have been using WPS Office for several months now, and I have been very impressed with its features and functionality. I find WPS Office to be a very user-friendly application, and it is easy to learn how to use.
WPS Office has all of the features that I need to create and edit presentations, documents, and spreadsheets. I especially appreciate the built-in PDF editor, which allows me to edit PDF files without having to purchase a separate application.
FAQs
Can I add slide numbers to only some slides?
Yes, you can indeed add slide numbers to specific slides in PowerPoint. Simply follow these steps:
Step 1: Select the slides to which you want to add slide numbers.
Step 2: Go to the "Insert" tab in the PowerPoint ribbon.
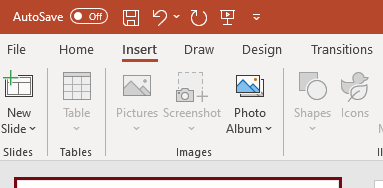
Step 3: Click on "Slide Number" in the "Text" group.
Step 4: Check the box that says "Slide Number".
Step 5: Optionally, you can choose to apply to "All" slides or "Selected" slides.
This flexibility allows you to customize slide numbering to suit your specific presentation needs.
How do I change the format of slide numbers?
To change the format of slide numbers in PowerPoint, follow these steps:
Step 1: Go to the "Insert" tab in the PowerPoint ribbon.
Step 2: Click on "Slide Number" in the "Text" group.
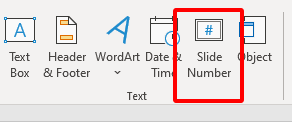
Step 3: In the "Header and Footer" dialog box, click the "Slide Number" checkbox if it's not already checked.
Step 4: Click the "Format" button.
Summary
This comprehensive guide has walked you through the importance of adding slide numbers in PowerPoint presentations, aiding in navigation and organization for both presenters and audiences. The step-by-step tutorial covers everything from initial setup to customizing slide numbers, ensuring a seamless process. The guide also addresses common problems related to slide numbering, providing practical solutions. A standout feature is the introduction of WPS Office, a powerful and modern office tool with advantages like free access to essential software, a robust PDF toolkit, and a rich template store. Lightweight and secure, WPS Office offers a versatile alternative for optimized presentations.


